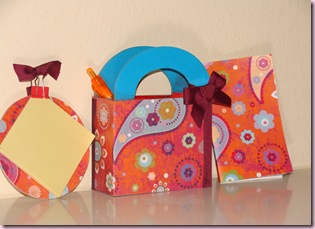
Here's what going to my Mom this MD! When I saw this wood purse at Michaels I immediately wanted to do something with it; it looked so cute. Then I was looking around and found some videos by ChicnScratch on Youtube for post-it holders and notepad covers. So I thought that I could combine all the ideas into one project.
Initially I painted the whole purse but I didn't like the final look so then I covered it with this beautiful paper from DCWV. It's not apparent in the photo but the paper has some glitter here and there which looks very beautiful! After covering with the paper, I then did 2-3 coats of Mod Podge (Satin, Hardcoat). It's water-resistant and it dries up to give a nice satin finish.
The video on post-it holder was for square coasters but I could only find these round ones at M's and I liked them. Covered them with DP and sanded the sides to get an even border. When I used to see people mention about sanding, I never realized the difference it would make; but when I did it myself I could see that it makes it so even!
The notepad has a magnet at the back so that it can put on the fridge. I used notepads similar to this. Covered them with DP. Another thing that I didn't know about was that you can easily cut a magnetic strip with your regular scissors. When I bought it I wasn't sure and asked the people at M's and they weren't sure either but it cuts very smoothly! I used ProMag Magnetic Strip Tape.
Both the things fit into the purse, for clarity purposes I photographed them outside the purse.
- Paper: DCWV Pocket full of posies with glitter
- Mod Podge, Tacky glue
- Turquoise acrylic paint
- Round coaster, post-its, notepad, magnetic strip

 A made this "little book" for Mother's Day. You can find the template
  I wanted to wait till Mother's day to post this but I was so excited about this project. It came about just I'd imagined, then this was my first with the Nestabilities and a first the "Jolies Fleur" stamp set and to top it all how can a girl go on without loads of praises for her work :). So here I am!

 There are 15 totally! The closeup photo that I took was before I added the sentiment. Since I'd make 15 of them I kept it simple. The sentiment was printed on the computer and the inside of the card too. I need to figure out a way to avoid the ugly corners when using a scallop scissors for cutting a polygon. Anybody has any secret recipes for it that they would like to share? Sure it'll cease to be a secret once you share it with me :)