Showing posts with label Technique - Background stamps. Show all posts

April 20, 2018

More foiling goodness

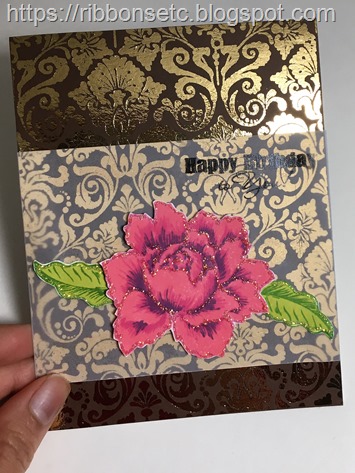
Birthday card with brown cardstock gold foiled and with floral stamped elements.

I’ve been having a lot of fun with stamp, copy and foil technique! Especially now that I have a template for the damask background, I can keep foiling away (as long as my foil doesn’t run out!).

I realized that so many times I draw my inspiration for colors and color combinations from the Indian sarees. Having done a few foiling with the dual-tone foil, I was thinking of what would be the appropriate color cardstock to use with gold foil. Then my mom’s saree came to my mind – it was brown with some gold design. I thought to myself how beautiful it would look to foil brown cardstock with gold foil (ironic since I never understand why my mom liked a brown colored saree Smile). That is how the background came into being.

The flower and leaf are stamped using distress inks and then outlined with stickles. I felt the shimmery background needed something equally glittery in the foreground. Vellum adds the softness to highlight the floral elements. I’m thankful for the vellum tape!

Supplies: Altenew peony bouquet stamp set, Impression obsession Damask background, Stampendous happy birthday, vellum, stickles, distress inks, Recollections cardstock, Mini minc machie, gold foil.

April 13, 2018

Foiling technique: Stamp, Copy and foil

Card with foiled damask background and sentiment printed on vellum

I was watching one of the foiling videos on youtube when I had a lightbulb moment! I can create foiled backgrounds using stamp, copy and foil!

What does it mean?

  1. Stamp your background stamp on a sheet of paper.
  2. Use your printer to make a copy of this on a cardstock.
  3. Foil the print on your cardstock!

Isn’t that simple? The best part if you can keep the stamped image as a template and any time you need a background foiled use that to make a copy. That way you don’t have to stamp again and again (not for the same stamp at least). That is what I did – stamped the background stamp on a full cardstock sheet. So now anytime I copy it, I can get two background panels out of it. I did the stamping with my Misti. While printing I chose to use 65 lb paper because that’s easier to use in a laser printer.

I had a lot of fun playing with this! Especially with that beautiful multicolor foil – with pink and gold! It looks so beautiful! I made another one here:

Card with foiled damask background and sentiment printed on vellum


I created the sentiment in inkscape, saved it as an .emf file. Then opened it in Word and printed out multiple copies of it on vellum. The double benefit here is that since these are printed, I can even foil the sentiment on a different card if I want to.

Misti and the mini Minc are two fun tools that I love playing with!

Supplies: Impression obsession damask background stamp, Versafine onyx ink, printer, Heidi Swapp foil, Mini minc, vellum

November 10, 2017

Inlaid die cuts

Celebrate card with gingham background and die cut flowers and pearls

I stamped the background using a gingham background stamp. Then die cut the background with the larger flowers. Also die cut the large flower in a dark blue cardstock. Using the inlaid die cut technique, placed the blue die cut flowers in the spaces in the background panel. To these I added the light blue die cut flowers and finally embellished with adhesive pearls. Decorated the card with stickles and stamped the sentiment. It looks so pretty! My goal was to make a masculine card with the gingham background but my girly brain always takes the turn towards flowers, glitters and pearls! Sigh!

Misti helped me in getting a nice background as I could stamp repeatedly till I was satisfied! Love that ability!

Supplies: Waltzingmouse Say it loud stamp set, PapertreyInk dies, Recollection colored cardstock, Impression Obsession cover-a-card Gingham background, adhesive pearls, Stickles, Misti stamping tool, Memento dew drops.

March 4, 2016

Shopping bag repurposed into a gift bag

hero arts, copics

When I get these shopping bags from different stores, it really hurts me to just throw them away. They are so well constructed that they deserve a second life. On those lines I thought that it would be nice if I could alter them into gift bags! This is not my first attempt. I’ve done some in the past too. This was a shopping bag from Gap, I hid the logo using this card panel. The card panel was created by stamping the basic grey’s background stamp and then coloring it with copics. The border was created using double sided tape and gold foil.

  • Stamps: Hero Arts Basic Grey Large Petal Background stamp
  • Copics, gold foil and double sided tape

July 27, 2015

You’re out of this world!

Technique tuesday Out of this world, Impression obsession Herringbone stamp

I’m always in the mood of making backgrounds especially by doing some sponging. So during one such moment I created this ombre background by embossing the background stamp in silver and then sponging on top of it. Once I’d the background I wasn’t sure what to do. Then I realized that it would make for a nice whimsical space scene! Hence was born my card!

The images are colored in copics. This is the first shaker card I’ve created. I used foam tape to create the cavity and added some martha stewart glitter (which I’ve plenty of!) to it.

Technique tuesday Out of this world, Impression obsession Herringbone stamp

Pleased with my idea Smile

  • Stamps: Technique tuesday Out of this world, Impression obsession Herringbone stamp
  • Papertrey Ink Cardstock, Copics, glitter, silver embossing powder

July 20, 2015

Thanks card set

impression obsession damask cover-a-card, Waltzingmouse stamps say it loud

Made a set of notecards. It was very simple but a lot of fun! Stamped a background. Die cut an oval. Embossed the sentiment in white. Swiped the oval with the same ink.

impression obsession damask cover-a-card, Waltzingmouse stamps say it loud

Used a gold gel pen above to do some doodling.

impression obsession damask cover-a-card, Waltzingmouse stamps say it loud

Used a silver gel pen to add some interest to the pattern.

  • Stamps: Impression Obsession Cover-a-card damask, Waltzingmouse Stamps Say it loud
  • Papertrey ink cardstock, memento inks, Zing white embossing powder, gold and silver gel pen

July 13, 2015

Carousel

lawn fawn admit one

I was going for a retro circus look and feel here and I think I quite succeeded at that. really like how this card turned out! Wasn’t sure what sentiment I wanted to add so left it blank.

I created an oval mask from contact paper. Adhered it to cardstock. Sponged mustard seed distress ink. Then stamped the polka dot background using memento blue ink. Removed the mask. Stamped the carousel. Colored it with prismacolor pencils. Stamped the horses on other cardstock, colored and then cut out. Adhered them with foam tape. My prismacolor pencils are getting the love again!

  • Stamps: Lawn Fawn Admit One, Polka dot background
  • Papertrey ink cardstock, prismacolor pencils, memento tuxedo black ink

April 20, 2015

More rainbow background


 hero Arts Basic Grey Large Petal background, My Sentiments Exactly Anniversary sentiments

I used a similar technique to make this background as I did here. Except that I forgot to wet the cardstock in this case and I like how it turned. You can see defined squares of colors and that’s because the distress ink pads are squares Smile  I white embossed the stamp on the cardstock. Smooshed them on craft-sheet, mist with water and then press the cardstock onto it. If you miss some areas, just press it again. I misted the cardstock a little after doing it to ensure a better coverage. After it dried I squeezed some stickles on the craft sheet and then using my finger spread it onto the cardstock. Pretty simple eh!

  • Stamps: hero Arts Basic Grey Large Petal background, My Sentiments Exactly Anniversary sentiments
  • Distress Inks, white embossing powder, stickles, memento tuxedo black ink

February 23, 2015

Anniversary Wishes

DSC_0082

White embossed the background on three different colored cardstocks. Fuzzy cut the design and popped it using foam tape. White embossed the sentiment on vellum.

  • Stamps: hero Arts Basic Grey Large Petal background, My Sentiments Exactly Anniversary sentiments
  • Paper: Papertrey Ink
  • Ink: Versamark
  • Accessories: Zing white embossing powder

February 9, 2015

Thanks (again :))!

DSC_0084

Stamped the background in black ink. Cut the sentiment using KNK Zing. Embossed it in gold embossing powder. Doodled around the outline of the card using gold gel pen

  • Stamps: Hero Arts Basic Grey Large Petal Background
  • Paper: Papertrey Ink
  • Ink: Memento Tuxedo black, versamark
  • Accessories: Gold embossing powder, gold gel pen

February 2, 2015

Thanks

It’s been quite a while since I posted any of my creations. Life has been busy on my side of the world. I was able to squeeze out sometime for my creative outlet but didn’t get any time to share them here. Now that I do, you would see me sharing more regularly!

DSC_0085

I Looove this stamp! It’s so gorgeous! It’s one of those designs that I know I’ll love just when I look at it!

Stamped the background in walnut stain ink. Cut the sentiment using KNK Zing. Embossed it in clear embossing powder. Doodled faux stitches around the outline of the card using white gel pen

  • Stamps: Hero Arts Basic Grey Large Petal Background
  • Paper: Papertrey Ink
  • Ink: Distress ink Walnut Stain
  • Accessories: Clear embossing powder, white gel pen

September 29, 2014

You make my world go round

DSC_0010

For the background:

  1. White emboss ticket stamp on watercolor cardstock
  2. Sponge various distress ink ink pads on a craft sheet
  3. Spritz water on the watercolor cardstock till its all wet.
  4. Press the wet side of the cardstock onto the craft sheet.
  5. Stamp with herringbone background stamp.

Rest of the card is fairly straightforward. Stamped, colored and fuzzy cut the carousel and balloons. Stamped the sentiment on white cardstock. The carousel is popped on foam dots. The strings for the balloon are hand drawn using a black pen. On and the sentiment – it was in two lines so I cut it out. Yes I was scared but there were no casualties Smile

  • Stamps: Lawn Fawn Admit One, Impression Obsession Herringbone cover a card
  • Watercolor cardstock, distress inks, spectrum noir markers.

August 4, 2014

You rocked it

DSC_0071


This was quite a simple and fun card to make! For the chalboard effect, I stamped the sentiments in white pigment ink and then went over them with a white pencil. To highlight one sentiment of all, I embossed it in white embossing powder. Then doodled some stas with white pencil.

  • Stamps: LLD Document It – Rock On, Impression Obsession Music background.
  • Distress inks, white embossing powder, white prismacolor pencil, white pigment ink.

July 17, 2014

Thank you card

WP_20140715_001

To create the background: I sponged the card with Antique Linen first. Then stamped music background with Antique Linen and finally sponged around the edges with Walnut Stain.

Stamped the thank you on brown cardstock and embossed it in gold embossing powder. Distressed the edges using a ruler. Punched a hole and put in an eyelet.

  • Stamps”": Impression Obsession cover a card music, Waltzingmouse Say it loud
  • Distress inks, Papertrey Ink cardstock, gold embossing powder

April 2, 2014

Congrats on your new home

DSC_0404

One of our close friends recently purchased a new home and I made this card for them. I’d been looking at all the pop up cards popping up (no pun!) made with the Pop up card studio and I wanted to make something on my own. This was also a good time to get familiar with my new electronic cutter – KNK Zing. When I thought of making a card for the new home owners, I thought to myself how nice it would be if I could do a 3D picture of a cute little house, with a big shady tree, a white fence… and that’s how the vision for this card was setup.

Then I started looking around for the perfect house and I found this at Miss Kate’s Cuttables and at 50 cents it was quite a steal! The fence and the tree are cut files from the MTC gallery.

Here’s the front of the card

DSC_0403

The letters are cut using Zing.

A few words about the zing – it is absolutely amazing! It took me some time to ramp up but I totally love it now! What I like best is that it cuts the PTI cardstock like butter in just one pass! All the CS above is PTI CS. Look at how well the Zing cut the teeny tiny details in the window! I’ll try to do a full review some time later.

  • Stamps: Impression Obsession Quatrefoil
  • Others: Papertrey Ink CS, Walnut Stain distress ink, KNK Zing.

December 19, 2013

You are my best catch

DSC_0003

Sponged the card base (watercolor paper) in peeled paint. Stamped the Text BG. Diecut an oval in card front. Stamped the penny black image. Colored using distress inks and water brush. Created the sentiment using Milo’s ABC and hand drew the dialog box then fuzzy cut it.

Stamps: Penny black good catch, Waltzingmouse stamps text it, Lawn Fawn’s Milo ABC

December 12, 2013

Always and forever

DSC_0001

Sponged the card base (watercolor paper) with Distress Ink dusty concord. Then stamped the Wallpaper BG stamp. Die cut a circle in the card front. Stamped the penny black image. Colored with distress inks and water brush. Stamped the sentiment in versamark and embossed with white embossing powder. Created two lines with glossy accents and sprinkled some glitter on them. Fuzzy cut hearts, colored them red and covered with glossy accents. Then popped them with foam dots.

Stamps: Impression obsession cover-a-card Wallpaper, Waltzingmouse stamps Say it loud, Penny Black Good catch.

January 14, 2013

Cuckoo!

DSC00664

Can you believe this almost a one layer card?!?!? Sponged the upper half with tumbled glass and the bottom half with Dried marigold. A painter’s tape is very helpful in masking and keeping the card in place while you sponge!

Masked the bottom half and stamped polka dot background. Embossed the bottom half with swirls EF. Sponged lightly on it with spiced marmalade. For the strip, sponged the spiced marmalade directly onto white CS. Colored the image with spectrum noir markers.

  • Stamps: Hero Arts Cuckoo
  • Paper: PTI and CC
  • Swirls EF, distress inks, rhinestone, spectrum noir markers.

January 9, 2013

I love love love you

I made two somewhat different cards using the same stamps.

DSC00657

Stamped the image in memento and colored with spectrum noir markers. Sponged the card vase with Spiced marmalade, barn door and broken china. Stamped the border repeatedly with fired brick.

DSC00659

In this card I simply embossed the card base.

  • Stamps: Penny Black I love you, Waltzingmouse Wild West borders
  • Paper: PTI and Crafter’s companion white
  • Spectrum noir markers, Lifestyle crafts Label embossing folder, distress inks – spiced marmalade, barn door, broken china and fired brick.

December 5, 2012

Sending birthday wishes


Background created by embossing IO Damask cover-a-card in white on an eggplant CS. The sentiment stamps are from WMS Say It Loud. The flower was sponged using distress ink Mustard Seed and Spiced Marmalade. The center was colored using a red spectrum noir marker. Glittered with stickles.