November 3, 2017

Peony bouquet happy anniversary

Anniversary card with Altenew Peony Bouquet stamps

Had so much fun making this card with Altenew Peony Bouquet stamp set and my misti! I used a combination of distress inks and memento dew drops. The sentiment is from My Sentiments Exactly.


Anniversary card with Altenew Peony Bouquet stamps

Supplies: Altenew Peony Bouquet stamp set, My Sentiments Exactly Anniversary Innies and Outies stamp set, Misi stampipng tool, Distress inks, Memento Dew Drops, Neenah solar white cardstock, Papertrey Ink Pink cardstock.

October 27, 2017

Hippo Bird-day

37894708266_63c048081c_o

The hippos in th Happy Hippo set from MFT are so cute! The set has many hippos and all doing different things which gave me the idea to make this card. I wanted it to look like all these hippos are coming in different directions and eyeing the cupcakes. The circle die cuts serve as windows. Really loved how it turned out!

Supplies: MFT Happy Hippo, Zig Clean Color Brush markers, Stickles, memento tuxedo black ink, Bristol Smooth cardstock for watercoloring and PapertreyInk cardstock for the base.

June 28, 2017

Another pop up box card – garden theme

DSC_0476

If you would like to know how to make these pop up box cards without using a die refer to my previous post. They are really easy to make and look so cute!!

For this one, I changed the dimensions a  little bit. In the previous post, the box flaps and the box sides are the same dimensions 2” X 2.5”. In this I changed the box flap to 1.5” X 2.5” and the box sides are 2.5” X 2.5”. I think I liked the original dimensions  better – although this looks good as well.

I used a strip of acetate cardstock to attach the bee so that it looks like it’s hovering above the grass. I colored the images using copics as well as prismacolor pencils. The grass die cut I had cut using my zing sometime back.

A closer look:

DSC_0478 (2)

Supplies: Lawn Fawn Gnome Sweet Gnome, Copics, Prismacolor pencils, KNK Zing, acetate cardstock, Papertrey ink cardstock.

June 21, 2017

Pop-up box card – without using a die

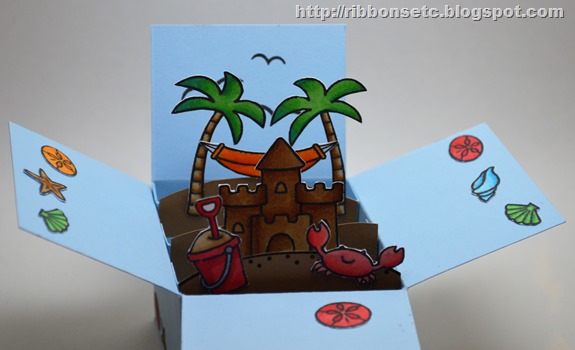
Pop up box card without using a die

You must have seen pop-up box cards popping up (pun intended!) all over the internet! They look so adorable that I wanted to try some out! The good thing about these is that they’re pretty flat – of course not as flat as a single or double layer card but still not bad. Plus they don’t need additional equipment. Yes there are dies in the market for these but you can make them just using your paper trimmer!

Here are some more views

Pop up box card without using a die

and more

Pop up box card without using a die

Here’s what you need to make these:

  • 1 - 4” X 10.5” cardstock
  • 3 – 0.5” X 3” cardstock strips (this is where the sand castle, crab and trees are attached to in the above card)

Instructions:

  1. Take the 4”X 10.5” cardstock.
  2. Score the short side at 0.5”, 2.5”, 4.5”, 6.5” and 8.5”.
  3. Score the long side at 2”.
  4. For the scoring that you did in Step 2, cut the score line from one end to the 2” score line (from step 3). For the 0.5 inch score, cut away the 2” X .5” strip.
  5. Glue the short sides together using the 0.5” scored tab.
  6. Now you have your box ready. You just need to add the strips. Before you attach the strips decorate the outside of the box if you want to. It’s much easier to do this now than after the strips are attached. Of course you can do it then as well if you change your mind.
  7. For the strips, score each at 0.5” and 2.5”.
  8. using the 0.5” inch tabs, attach the strips to the inside of the box as shown above. I just eyeballed the distance. However if you are not comfortable doing that then mark the box edge at 0.5” distances. The first strip is at 0.5”, the second at 1”, the third at 1.5”.
  9. Voila! Your pop-up box is ready!

Supplies: Lawn fawn Life is good stamp set, Copics, Papertrey Ink cardstock.

May 24, 2017

Amigurumi: Cutest little owl

33574572871_24759aaf85_o

I’m always looking for some amigurumi patterns. When I found this one I knew I had to make one (I think I might make more than one Smile). Isn’t it the cutest owl?!?! Love he colors!
The pattern worked mostly. Couple of things I struggled with:

1. The head was not perfectly round. If you stare at it enough you’ll see that the top is pointed. I had to make sure that I didn’t fill it to the full or it would have looked very pointed at the top.

2. Like everything else in amigurumi, the white eye patched were worked in spirals as a result of it when you finish/end it, it’s not a complete circle. Maybe that is expected, just seemed weird to me.

Regardless of the issues, I still love how it turned out!

May 17, 2017

You’re out of this world

34153191860_398af96925_o

Made this card for Mother’s day. I think the sentiment is so apt for my mom – you’re out of this world! Sponged the background on watercolor paper using distress inks.

Supplies: Technique Tuesday Out of this world stamps, Zig clean color brush markers.

May 10, 2017

Flamingo scene

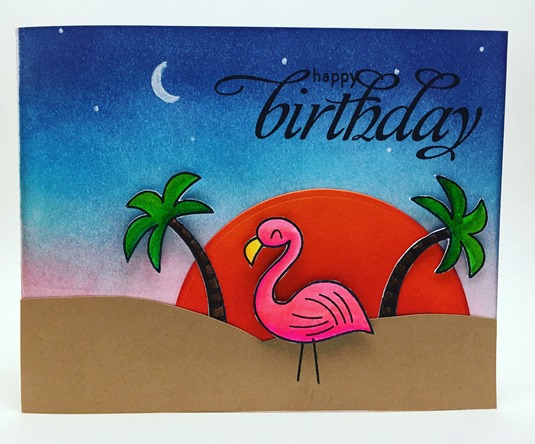
Happy birthday greeting card featuring beach sunset with flamingo

Really loved how this turned out! I’d been searching for different ways to use a flamingo stamp and then I came across a card that built a scene. That made me search for flamingo photos… one thing led to another and I wanted to create a beach sunset scene.

The sky was sponged using distress inks, the sun was cut using dies. The beach was fuzzy cut.

Supplies: Lawn fawn Gnome Sweet Gnome stamps, Lawn fawn Life is good stamps, distress inks, nestabilities, Waltzingmouse stamps Say it loud, Zig Clean color brush markers.