Showing posts with label Glitter. Show all posts

April 27, 2018

Mother’s day card

41523245101_65fe46865b_o

Another mother’s day card! Had so much fun making it! Love love love the multi-step stamping stamps from Altenew! I have used this peony bouquet for anything and everything! Cut out the sentiment using Portrait. Used distress inks for stamping.

Then covered the flowers in shimmer usking wink of stella pen. A closer look below.

41523245891_e34db7582d_o

Supplies: Altenew Peony bouquet stamp set, Distress Inks, Neenah solar white, Silhouette Portrait, WInk of Stella pen.

April 20, 2018

More foiling goodness

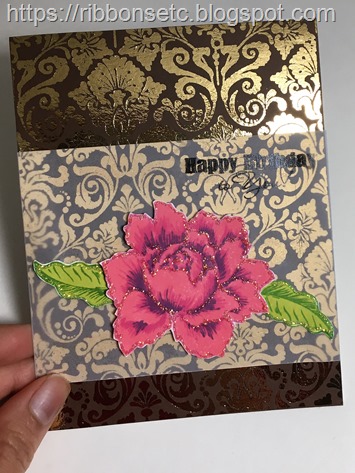
Birthday card with brown cardstock gold foiled and with floral stamped elements.

I’ve been having a lot of fun with stamp, copy and foil technique! Especially now that I have a template for the damask background, I can keep foiling away (as long as my foil doesn’t run out!).

I realized that so many times I draw my inspiration for colors and color combinations from the Indian sarees. Having done a few foiling with the dual-tone foil, I was thinking of what would be the appropriate color cardstock to use with gold foil. Then my mom’s saree came to my mind – it was brown with some gold design. I thought to myself how beautiful it would look to foil brown cardstock with gold foil (ironic since I never understand why my mom liked a brown colored saree Smile). That is how the background came into being.

The flower and leaf are stamped using distress inks and then outlined with stickles. I felt the shimmery background needed something equally glittery in the foreground. Vellum adds the softness to highlight the floral elements. I’m thankful for the vellum tape!

Supplies: Altenew peony bouquet stamp set, Impression obsession Damask background, Stampendous happy birthday, vellum, stickles, distress inks, Recollections cardstock, Mini minc machie, gold foil.

April 6, 2018

Sending tons of love

Sending tons of love card with glitter background and MFT Happy hippo stamp set

I made this background as one of my first projects with Portrait 2. It looks much better IRL! Colored the hippo and hearts with copics and then added stickles to the hearts. Popped them up on foam stickers. Pretty simple!

Supplies: DCWV Glitzy stack, MFT Happy Hippos stamp set, Copics, Portrait 2, Stickles

March 30, 2018

More peony bouquet

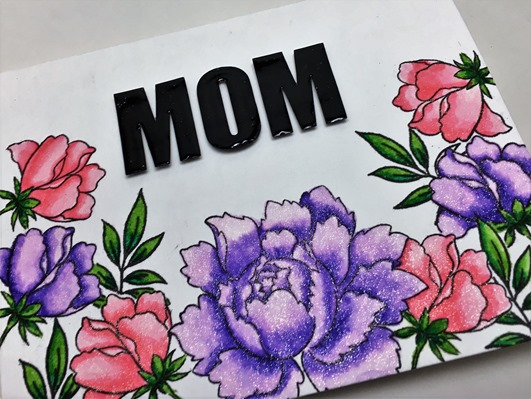
Mother's day card with Altenew Peony bouquet stamp set

After making the previous card, I wanted to do some more with Peony bouquet. I feel it’s a very versatile set. You can do whatever you want with it – do multi-step stamping or stamp the outlines and color them; color them with copics, pencils or zig clean color markers; emboss them; color with pastel colors or brights. The options are endless for the kind of result that you want. All these options is what made me want to do more with that stamp. Something different every time.

I stamped the flowers and leaves with some masking on watercolor paper. Initially I tried to watercolor using zig clean color markers. So I would wet the area that I was going to color and then drop the color using the markers. The big flower in the center is colored using that. While now I like that look more than the other flowers, when I was coloring it, it didn’t feel so. Also, somehow that kind of coloring wasn’t much fun for me – maybe because I wasn’t liking the results so much. The rest of the flowers I colored in the traditional way where I would color the darkest areas first and then using a watercolor brush spread the color to the lighter areas. I did have a lot of fun doing that! For the leaves I just blended the light green and dark green.

The flowers are covered in glitter using the Wink of Stella pen. The sentiment was cut using Portrait 2 and then covered with Glossy accents. A close look at the glitter and the glossy sentiment. Loved everything about this card ad just perfect for my mom or mom-in-law! I do want to add “love you” above the MOM – probably a handwritten message and then it’s good for either Mother’s day or a birthday card!

41051969592_aff1cdc96b_o

December 22, 2017

More chevron background

24344591567_c6365f4abf_o (2)
Like I mentioned before, I cut a lot of chevron background from my Portrait Smile! Here’s another one. I love the simple look of this card! Cut the sentiment using Portrait as well. The stamp is colored with copics and then added some shimmer using Wink of Stella on the balloons and the bow. A closer look at the shimmer here:
39205697641_ecae0a69c6_o
Supplies: My Favorite Things Happy Hippo stamp set, Copics, Wink of Stella.

December 15, 2017

Anniversary wishes with Peony Bouquet

39031470732_db68723f38_o (2)

I’ve been having fun cutting the chevron background with Silhouette Portrait 2 (used this design). Here I used the inlaid die cutting technique. I cut the purple glitter paper in chevron and then the antique silver glitter paper also in chevron. In the purple background I fit in pieces from antique silver and vice versa. As a result I was able to get two backgrounds! When I finish the card with the other background will share that as well. It was a lot of fun – I created four card bases using this background!

The peony was stamped using versafine onyx black and colored with Zig Clean Color Real Brush Pens. The leaves were stamped using the distress inks. The sentiment is stamped in black on vellum and then clear embossed.

If you look closely at the envelope (underneath the card), I stamped that too with peonies – in memento yellow ink. Looks really pretty!

Supplies: Altenew Peony bouquet stamps, My Sentiments Exactly Anniversary Innies and Outies stamp set, Misi stampipng tool.

December 8, 2017

First card using Silhouette Portrait 2

Happy birthday card with blue chevron background and the sentiment in silver glitter paper, with three stars

I’d been waiting for the black friday sale to get a silhouette portrait 2. I sold my KNK Zing sometime back and this was my replacement for it. Zing was a great machine but much more powerful (and hence complex) than my needs. It was also quite big (like other 12” cutters). I leaned towards the Portrait 2 for a couple of reasons:

  1. I really like the variety of designs in Silhouette Design Store. It gives you a lot of options.
  2. I do not cut anything that’s greater than or equal to 12” on all sides. I can still cut anything greater than 8” in the portrait as long as the other side is less than 8”. That fits the bill for all my projects.
  3. The smaller size and the light weight of Portrait swayed me towards it. Smaller size definitely helps in saving space. light weight was probably more of a feel good factor because it’s not like I carry it around.
  4. It has the same cutting capabilities as the Cameo – including the bluetooth. I believe the stipple feature is only for Cameo but I don’t care much for it. No longer I wanted to buy a machine thinking “oh what if I needed that feature once in 2 years”. I wanted to buy for my common scenarios.
  5. Love the auto-blade feature!

While the price wasn’t that much discounted ($160 vs $200 regular price), I did get $125 credit for Silhouette Design Store and 150 free designs.

Now going back to the card, I really like the clean cuts from the Portrait. For the font I used “bauhaus 93”. It’s one of the fonts that comes pre-installed on Windows. I got the stars from one of the free designs and the chevron background is this design in the store. The glitter paper is from DCWV Glitzy stack. Love that paper! It has glitter but not the kind that rubs off and the paper is very smooth. I used 65lb paper for the background.

Portrait cut settings:

  • For DCWV Glitzy cardstock, I used the built-in “Cardstock, Glitter” setting.
  • For the 65lb cardstock, I used the built-in “Cardstock, Plain” setting.

November 3, 2017

Peony bouquet happy anniversary

Anniversary card with Altenew Peony Bouquet stamps

Had so much fun making this card with Altenew Peony Bouquet stamp set and my misti! I used a combination of distress inks and memento dew drops. The sentiment is from My Sentiments Exactly.


Anniversary card with Altenew Peony Bouquet stamps

Supplies: Altenew Peony Bouquet stamp set, My Sentiments Exactly Anniversary Innies and Outies stamp set, Misi stampipng tool, Distress inks, Memento Dew Drops, Neenah solar white cardstock, Papertrey Ink Pink cardstock.

October 27, 2017

Hippo Bird-day

37894708266_63c048081c_o

The hippos in th Happy Hippo set from MFT are so cute! The set has many hippos and all doing different things which gave me the idea to make this card. I wanted it to look like all these hippos are coming in different directions and eyeing the cupcakes. The circle die cuts serve as windows. Really loved how it turned out!

Supplies: MFT Happy Hippo, Zig Clean Color Brush markers, Stickles, memento tuxedo black ink, Bristol Smooth cardstock for watercoloring and PapertreyInk cardstock for the base.

April 27, 2015

Glittered stencil

KNK Zing, MTC, Stencil

Ooh I love what I did here Smile. I used the stained glass pattern here and traced it in MTC. Then I used the technique described here to do the glitter part. The “Mother’s” is also cut out using Zing. White embossed “happy” and “day”. Rounded the corner using the We r memory’' keeper’s corner chomper.

April 20, 2015

More rainbow background


 hero Arts Basic Grey Large Petal background, My Sentiments Exactly Anniversary sentiments

I used a similar technique to make this background as I did here. Except that I forgot to wet the cardstock in this case and I like how it turned. You can see defined squares of colors and that’s because the distress ink pads are squares Smile  I white embossed the stamp on the cardstock. Smooshed them on craft-sheet, mist with water and then press the cardstock onto it. If you miss some areas, just press it again. I misted the cardstock a little after doing it to ensure a better coverage. After it dried I squeezed some stickles on the craft sheet and then using my finger spread it onto the cardstock. Pretty simple eh!

  • Stamps: hero Arts Basic Grey Large Petal background, My Sentiments Exactly Anniversary sentiments
  • Distress Inks, white embossing powder, stickles, memento tuxedo black ink

August 25, 2014

Always

DSC_0076

Remember this card? I figured I could make good use of the leftover circle from that card. For the sentiment, for the first time I cut out my sentiment stamp!!! Surprised smile I always saw jennifer mcquire do it but was always scared. However for this card I took a bold step and glad that I did!

Cut out always using Zing and then covered it with glossy accents. Colored clear rhinestones using sharpies to make them match the glitter colors.

DSC_0078

  • Stamps: Tim Holtz Thoughts and Prayers

June 23, 2014

Glittered sentiment

WP_20140615_001

This card follows the same technique as my last card.

Cover your cardstock with double sided adhesive tape/sheet. Die-cut the sentiment, with the die on top of the side with the liner (for the double sided adhesive tape). In my case I die cut the sentiment using Zing, my electronic die cutter. While die cutting make sure that you don’t cut all the way through. In fact you just need a light enough impression that it cuts through the liner of the double sided adhesive tape.

WP_20140601_003

Remove liner for C, N, R and T.  Alternate letters in “CONGRATS”

WP_20140601_004

Pour purple glitter on it, burnish it with a bone folder and then clear away the excess using a painting brush with soft bristles.

WP_20140601_005

Do the same for gold glitter.

WP_20140601_006

And lastly with the background, silver.

WP_20140601_007

After finishing all colors, pour some glossy accents on your craft sheet. Using your finger spread it over the glitter. This will seal the glitter and you wouldn’t have the recipient having glitter all over them.

WP_20140601_008

Stamped the Damask background using Aged linen.

WP_20140601_009

And finally add the glittered panel to the base using some foam tape.

October 26, 2012

Diwali bloghop–Day 2

I hoped you enjoyed the ideas and inspiration shared by the team on day one of the bloghop! Here’s another day full of creativity! Day 2 is devoted to anything-but –a-card!

I’ve had a banner on my to-do list forever! So when deciding what to make for the bloghop I figured that I should make a banner and check off that item from my list after all!

[My apologies for the poor lighting]

DSC00498

Instead of making something very specific like “happy diwali”, I chose to make something more generic based on the theme of diwali and which would also be an inspiration for everyday life. To me Diwali is all about celebration. Celebrate the festival, celebrate the homecoming of Lord Ram, celebrate with friends and so on. “Celebrate” is also an inspiration for me – it tells me to celebrate life. Everyday. As it happens. Celebrate every moment. Celebrate what you have.

Coming down to the mechanics of this banner: I used Cricut and SCAL to cut the triangles and the letters.

DSC00503

  1. The triangles are 5” X 5” and cut on PTI cardstock.
  2. The doilies are 4” white doilies. They’re sponged with various distress inks and then sprayed with glimmer mist made using Inka gold. Just add some Inka Gold to water in a mister and shake well. Then spray. If you don’t have anything to make glimmer mist, then don’t worry. This banner would look as good even without it.
  3. For the letters: I used a double-adhesive sheet. Applied it to one of the cardstock. Then cut the letters. The letters are cut using the Samarkan font. From the cut letters, remove the liner from the other side of the adhesive sheet. Sprinkle glitter on it. Seal the glitter by rubbing glossy accents all over it.
  4. I adhered the one doily to each triangle. Then glued the letter on top of it. Made two holes on either side of the triangle for the ribbon.
  5. Thread the ribbon through all the triangles. Voila! Your banner is ready!

This banner is quite easy and quick to make; just that the glitter part takes some time and maybe a little messy but it’s worth it!

My second project is something that I plan to make for my friends this Diwali – little mason jars filled with some homemade treats! These jars are so cute and adorable!!

DSC00507

I used a 5” square of fabric cut using pinking shears. Here’s a closer look at the tag.

DSC00509

I cut the tag from white CS using Cricut and Tags, Bags, Boxes and More Cartridge. Stamped it with a background stamp using versamark and then embossed in gold embossing powder. Sponged it with various distress inks. Printed the sentiment on vellum using Word. Cut out the diya using Cricut and SCAL.

That’s not all! All my other team mates have some wonderful creations to share too:

Supplies

Banner: PTI cardstock, White 4” doilies, 65# cardstock for letters, Martha Stewart brown glitter, brown grosgrain ribbon, glossy accents, Inka gold platinum, Mini mister, Distress Inks – Mustard seed, dried marigold, broken china and peeled paint.

Tag: PTI white CS, Impression Obsession Damask cover-a-card, Vellum, Distress Ink – Fired brick, peeled paint and Dried marigold.

July 18, 2012

Stretch Your Stamps – Floral stamps ( day 7)

Yes I’m missing Day 5 & 6 – yet to catch up with samples for those classes.

For once I can say that I’d some stamps in the category of the day and what better floral stamps than Blossom Art! I didn’t have microfine glitter but I really liked the technique of stamping on glitter so I did the reverse. I stamped and then added glitter to the image. The most important thing I learnt was to seal the glitter – I did that using glossy accents. What you need to do it rub glossy accents all over the glittered image with your finger.

The center of the flower seemed to be getting lost in the glitter so I wanted to bring attention to it. First I picked some rhinestones but the glitter was too overpowering. So I figured that I needed to soften it down and pearls seemed to do the job.

DSC09969

Stamped the image in Shabby Shutters on the CS. Stamped the image in black on white CS. Filled the area with quickie glue pen and then added glitter to it. I did one color and one petal at a time. Also somehow putting glitter on the image doesn’t work as well with me as putting the image to glitter. So I sprinkle some glitter on my non-stick craft mat and then after adding glue to the image, press down the image on the glitter. Added ribbon. Embossed the sentiment in silver on vellum.

  • Stamps: Hero Art Blossom Art, Waltzingmouse Say it loud
  • Memento black ink, Distress ink, Martha Stewart Glitter – bronze and silver, silver embossing powder, adhesive pearls, ribbon.

June 27, 2011

Simply Sketches #6

This sketch came to me by total serendipity and my sample made me very happy!

SimplySketch6

To be honest I prepared the inner panel and was going to stick it parallel to the base. I simply laid the panel on top of the base diagonally while I prepared to glue them together and I realized that it looked better than in parallel!

DSC07158 I cut the burgundy CS 4.25 X 5.5 inches. Stamped the flowers in versamark. Embossed them with white embossing powder. Colored them with prismacolor pencils. Colored the centers with white gel pen. Adhered a pearl on the centers and embellised the petal with Stardust stickles. Put the burgundy CS on the base diagonally. Glued them and then cut off the burgundy CS that was sticking out.

  • Stamps: Hero Arts Blossom Art
  • Paper: Papertrey Orange, Burgundy
  • Others: Prismacolor pencils, White gel pen, adhesive pearls, ribbon from Michaels, Starduct Stickles

June 16, 2011

Cupcake card

This cupcake template has been sitting on my hard disk for a long time. I’d created it long back but wasn’t getting the time to use it.

DSC06981

Except for the cherry, all the cuts were made using Cricut and SCAL. I cut the cupcake base at 4.25 inches. Then cut the wrapper and the icing appropriately. The cherry was die cut using circle nestabilities. For the sentiment, I cut out cream CS, attached it to printer paper and then printed the sentiment on it using a computer and a printer. Then glued it using foam dots. The icing was outlined with diamond stickles glitter and the cherry was “glazed” with glossy accents.

  • Paper: Papertrey Ink Hibiscus Burst, Cream, Spring moss, K & Co Sweet Treats adhesive backed paper.
  • Others: Glossy accents, Diamong Stickles, Foam dots

Download the SCUT2 file for cupcake, wrapper and icing click here. Please do not sell or distribute the file.

May 23, 2011

Introducing Simply Sketches – Simply Sketches #1

I loved the sketches from WMS sketch challenges – they were so simple. Hence so conducive for CAS as well as non-CAS cards. However recently they changed their policy such that a challenge entry must have at least one WMS image. Unfortunately for me I don’t own any WMS stamps Sad smile. I do love them but I haven’t gotten down to that part of my wish list yet. Thus I could no longer participate in them. Since there seemed to be no other sketch challenge which had simple sketches I decided to create my own sketches.

I thought that there might be others who were in the same boat as I am and could benefit from these sketches. So I would post every sketch I create along with my sample. The sketch would be posted every Monday. Let’s hope I can follow that schedule Smile If you were inspired by my sketch and created a card I would love to see it. So please do leave me a comment with a link to your card. Your card doesn’t have to be CAS. You can use the same sketch in various ways:

  1. Rotate the sketch.
  2. Take it’s mirror image.
  3. Stretch or shrink it’s elements. Try not to do that to an extent that the basic layout of the sketch is lost.
  4. Any other way you can think of.

Here’s the first sketch and my sample:

SimplySketch1

I made a set of thank you cards using this sketch. This is also my entry to Hero Arts Fabulous Flowers contest.

DSC06336

DSC06339

I stamped the flower in versamark on vellum. Then embossed it in white embossing powder. Added some Diamond stickles to the petals and dotted the center with liquid pearls. The background was created by taking together some thank you sentiments and stamping them repeatedly using Versamark.

  • Stamps: Hero Arts Blossom Art, Inkadinkado Thanks
  • Paper: Papertrey Enchanted Evening, Berry Sorbet, Plum Pudding, Ripe Avocado, Orange zest
  • Others: Vellum, white embossing powder, Diamond stickles, Liquid pearls.

May 17, 2011

Buggys/Baby Carriages

I made these buggys for a friend. If you have a manual die cutting machine then you can get the instructions here. If you have an electronic cutter and SCAL, then you can download the SCUT2 file here. Please do not sell the file.
DSC06317
DSC06318
DSC06319
Aren’t they the cutest?!?! I also made her a tag. The picture doesn’t do justice to the tag.
DSC06320
I cut out the bottle shaped tag using SCAL and cricut. The shape comes with SCAL. I cut it at approx. 3 inches wide and 5 inches tall. Then I cut the flowers using SCAL too at 0.75 inches. I printed the poem using the printer. I attached the cut shape to a copier paper and then inserted into the printer. Adhered buttons to flower centers. Punched a hole with crop-a-tile at the top of the tag and then tied a ribbon. Embellished the flowers and the tag with Stickles Diamond stickles – not quite visible in the photo.
  • Paper: Papertrey Harvest Gold, Raspberry Fizz, New leaf, Lavender Moon, Lemon Zest (for flowers), Spring Moss (for flowers), DCWV Sweet Treat (for buggys)
  • Others: Cricut, SCAL, buttons, Stickles Diamond, foam dots, ribbons from Michaels.

April 14, 2011

WMS #42

I love WMS sketch challenges!! Somehow their sketches always manage to motivate me! Here’s the sketch for this week’s challenge.

42-Sketch4

This time I must say I’ve my own interpretation of the sketch. I always look at the sketch when the challenge is posted and then make the card based on what I remember of the sketch or how it inspired me.

I’d to make a wedding card for a relative and Indian weddings are all about bright colors and glitter (in the form of rhinestones, sequins or the more expensive diamond and gold). So that was my second inspiration for this card.

DSC06118

I stamped the round frames from Inkadinkado stamps in Bamboo and Dark green inks. Then I (masked and) stamped the flower from Jolies Fleurs. Colored the flowers using prismacolor pencils and OMS. It was after a long long time that I was coloring a card Smile. Glued a rhinestone on the centers of the flowers. Cut the label using Cricut and SCAL. Stamped the sentiment from Flourished Words in Tuxedo black. Outlined the frames with Diamond stickles. Here’s a better view of the bling:

DSC06119

  • Paper: PTI white and Orange zest
  • Stamps: Inkadinkado Rounded Frames Clear stamp set, Lizzie Anne Designs Jolies Fleurs, Flourishes Flourished Words
  • Others: Rhinestone, Diamond stickles, Prismacolor pencils, OMS, Cricut, SCAL.