March 30, 2018

More peony bouquet

Mother's day card with Altenew Peony bouquet stamp set

After making the previous card, I wanted to do some more with Peony bouquet. I feel it’s a very versatile set. You can do whatever you want with it – do multi-step stamping or stamp the outlines and color them; color them with copics, pencils or zig clean color markers; emboss them; color with pastel colors or brights. The options are endless for the kind of result that you want. All these options is what made me want to do more with that stamp. Something different every time.

I stamped the flowers and leaves with some masking on watercolor paper. Initially I tried to watercolor using zig clean color markers. So I would wet the area that I was going to color and then drop the color using the markers. The big flower in the center is colored using that. While now I like that look more than the other flowers, when I was coloring it, it didn’t feel so. Also, somehow that kind of coloring wasn’t much fun for me – maybe because I wasn’t liking the results so much. The rest of the flowers I colored in the traditional way where I would color the darkest areas first and then using a watercolor brush spread the color to the lighter areas. I did have a lot of fun doing that! For the leaves I just blended the light green and dark green.

The flowers are covered in glitter using the Wink of Stella pen. The sentiment was cut using Portrait 2 and then covered with Glossy accents. A close look at the glitter and the glossy sentiment. Loved everything about this card ad just perfect for my mom or mom-in-law! I do want to add “love you” above the MOM – probably a handwritten message and then it’s good for either Mother’s day or a birthday card!
41051969592_aff1cdc96b_o

March 23, 2018

Bleached look with distress inks

Happy birthday card with bleached look using distress inks

I saw this video from Jennifer McGuire where she used distress oxide inks and created the bleached look by drawing away some color using a water brush. Since I didn’t have distress oxide inks, I thought why not try it with regular distress inks as they too react with water. I first embossed the images in gold and then sponged with distress inks. Using a water brush I then brushed all the insides of the images, absorbing the color using a paper towel. The sentiment is embossed in black.

Supplies: Altenew Peony Bouquet, Hero Arts Birthday cling stamp, Gold embossing powder, neenah solar white cardstock, versafine black onyx ink, versamark embossing ink, Distress inks – Spiced Marmalade, Pickled raspberry and Dusty concord.

March 16, 2018

Leave your shoes at the door sign

39788245864_7766ee370d_o


Using this quote that I found online I created this design. The font for “Shoes and Worries” is “master of break”. The flowers and leaves are a free design that came with the silhouette portrait. The design is cut in vinyl. For the flowers and leaves, I got 12”X12” loose vinyl from Michaels. I used a clear grid transfer sheet to transfer the design. Overall it was quite simple! We hung it outside, next to the door, with a shoe rack below it.

March 9, 2018

Dining room vinyl wall art

28437409089_9deedf0bc3_o

For a long time our dining room wall was sans any decor because we had removed the old ones and hadn’t had the time to make anything new. I’d sold my Zing and was still waiting to get the Portrait. Once I had it, I ran into some hiccups. That meant a few calls to the customer support. The issue is still not resolved yet – the autoblade doesn’t work – but I can at least use it as a ratchet blade.

I’m so pleased with this vinyl art – not only did I cut it myself using a silhouette but I also designed it myself! Actually, I had full intention to buy a design so I started searching and I found this beautiful saying; but the design was very simple. Then I came across this etsy shop and they had such beautiful vinyl wall art. However,  they didn’t have a saying that I liked. So I thought why not try to create one on my own. With some dingbat searches and using the Silhouette Studio I was able to design this.

Cutting was another challenge because as you can see it’s much wider than what Portrait can cut. I searched for some instructions online to see how I could cut designs like these. The main take away was to cut the design into multiple parts using a knife and most importantly, use the shift key when using the knife so that you get a straight line. This is very important – I learnt it the hard way so learn it from me Smile Following the instructions I cut the design horizontally into around 7-8” wide sections. Then cut out each section using the vinyl roll (and not the mat).

After cutting, putting it together on the wall took me around 2 hours or so because I had to make sure everything aligned well and that the wordings were straight. So glad that I got a clear grid transfer sheet. Can you believe it that grateful was cut right in the middle???? It was so difficult to align all those thin curves together! I’m glad it looks fine now! I bought my vinyl and transfer sheet from expressions vinyl.

March 2, 2018

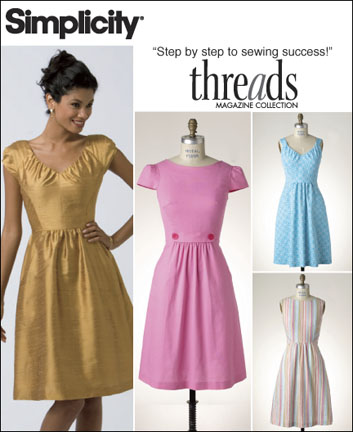
Pattern: Simplicity 2591

I had bought this pattern a few years ago (yes… that’s right! I know hard to believe…). Finally I decided to make a dress using it.

Here’s my finished dress:

39661962525_e16284e6e5_o

This dress went through a lot of trials (pun and no pun!) and tribulations. I tried it so many times in between and then had to make a lot of alterations. All because I didn’t read the size guide right. Looks like I needed the bust from one size and the waist and hips from another. Serves me right for not reading the pattern end to end! That’s when I decided to write this.

Because the bust size was bigger than what was right for me, the neck was wider than I wanted it to be. When I tried to make the neck smaller, the front and the back was messed up. With great difficult I saved this dress.

I love that fabric and that is why I was so mad at myself for not getting this right. Here are my thoughts after using this pattern:

  1. Read the sizing guide to see whether you can use one size or if you are in between. Of course this had to be my first feedback to myself!
  2. I felt the pattern was more intermediate than a beginner pattern. There were a few places where I wasn’t clear on the instructions. Once or twice I actually did the wrong thing, ripped the seam and started all over again.
  3. I need to learn how to get the neck right. Since the neck is cut on a bias, I think it stretched while was stitching. It didn’t help a neck that was wider to begin with.
  4. The zipper took me a few iterations to get it right. I got an invisible zipper because that’s what most of the readymade dresses have. The first zipper I stitched the pull came off and it’s hard to get it back in for an invisible zipper. So then I bought another zipper. Eventually after 2-3 tries I got it done and now it looks beautiful (invisible).
  5. If you see behind the neck, you will find two seams on either side of the zipper. I had to put them in because otherwise the back wouldn’t sit flat on my back.

Still I like the dress Smile