Showing posts with label Sewing. Show all posts

July 29, 2019

Peasant dress for my little one


I had a yard if fabric lying around from some time back. It's a fabric I just love (unfortunately it is not enough to make any apparel for myself!) so I was looking around for some dress pattern for my little one that would not only not require more than a yard of fabric but also be simple enough. This pattern fit the bill! I used the measurements for 2/3 yr old for my 3.5 year old. She was very happy to have it!
The pockets were my own addition (so proud of that!). This was the first time I tried shirring. It took quite a bit of reading, watching YouTube and some accidents before I got it right. Other than that the pattern is very simple and only takes 2-3 hours. I would highly recommend trying it out!

May 25, 2018

Pattern review: Simplicity Project Runway 2848

2848 (1)

As I’ve already mentioned here I have hoarded this pattern for a long time. Like a really long time. Think years. There was a time when just like people get tempted by fabrics, I would get tempted by patterns. Ooh this dress would look so nice, let me buy this pattern. It’s only a $1. I’ll have the dress ready soon (yeah right!). Fast forward a few years. The dream did come true! I do have a dress made from that pattern Smile and I love how it looks! You can see it in the picture below. No I did not stitch the shirt, that is ready made. Very happy that I could find just the right shirt for it.

28462142448_8219d094df_o

The pattern was on the simpler side. Not too may pieces to sew. It has pockets too and there is a side zipper. What I realized is that I could have avoided the zipper (and all t he time it took) because I can basically pullover this dress. The fabric is a linen blend that I bought from a local store - Pacific Fabrics; so it’s a little on the stiffer side. When reading the pattern I felt that such a fabric would be better suited than a regular cotton and I’m glad I went with that. The dress hits about an inch above the knee. Overall quite satisfied with the pattern. Not as easy as the Burda one but still not bad.

May 18, 2018

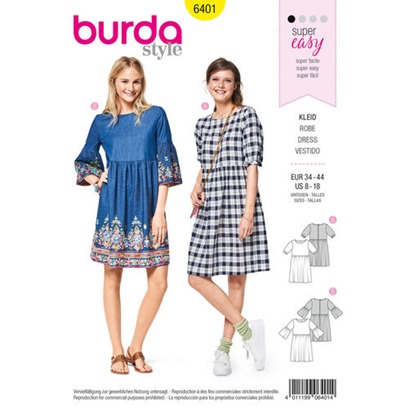
Pattern review: Burda Style 6401

Burda-swing-dress-pattern-B6401-envelope-front

Here’s my dress:

40364533410_7f5e41d145_o (2)

The dress came out very much to my liking! Unfortunately I couldn’t get as good a photo of it. It was just what I wanted. The fabric was perfect – light and soft with a really nice print and color. The dress was simple, one-layered and hassle-free. Exactly the things I was looking for.

The fabric I used is Robert Kaufmann’s Millefiore Tomato. It’s slightly lighter than regular quilting weight cotton.

This is the first time I was using a Burda pattern and I’m a fan now! What I liked so much about this pattern company:

  1. There is no wastage of paper. They try to optimize every inch of paper.
  2. Instructions were so straightforward and intuitive. Most of the times, what I was thinking on how it should be done is how it would be done. With Simplicity and McCall I always notice that they do things in a more complicated fashion.

Starting with my last couple of dresses I’ve been paying more and more attention on doing things the right way no matter how many times I’ve to rip apart the seams. So I read the instructions carefully and do all the due diligence. I think that is also helping. Well also the fact that it is supposed to be an “easy” pattern Smile

I’m also glad that I used my judgement with this dress. With my last one I realized that I didn’t need a zipper because I was able to pullover the dress without the zipper, So with this one, I decided to baste it without zipper and then try it on. Since I was able to pull this over as well, I skipper the zipper. This made it super easy from easy Smile Also, I love pullover dresses so it made me like it all the more! The other thing I did was to use mny sewing machine to stitch the hem rather than doing it by hand. I feel it didn’t make any difference and saved me so much time!

This is not a fitted dress – so if you’re looking for something that fits your form this is not it. This is your dress for those days when you’re looking for something easy to get into, that is comfortable and (with the print I chose) very cheerful!

You can see from my description I’m one happy camper after making this dress Smile

March 2, 2018

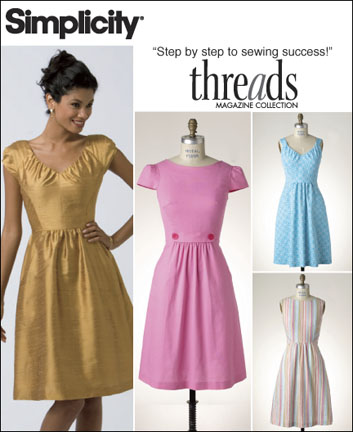
Pattern: Simplicity 2591

I had bought this pattern a few years ago (yes… that’s right! I know hard to believe…). Finally I decided to make a dress using it.

Here’s my finished dress:

39661962525_e16284e6e5_o

This dress went through a lot of trials (pun and no pun!) and tribulations. I tried it so many times in between and then had to make a lot of alterations. All because I didn’t read the size guide right. Looks like I needed the bust from one size and the waist and hips from another. Serves me right for not reading the pattern end to end! That’s when I decided to write this.

Because the bust size was bigger than what was right for me, the neck was wider than I wanted it to be. When I tried to make the neck smaller, the front and the back was messed up. With great difficult I saved this dress.

I love that fabric and that is why I was so mad at myself for not getting this right. Here are my thoughts after using this pattern:

  1. Read the sizing guide to see whether you can use one size or if you are in between. Of course this had to be my first feedback to myself!
  2. I felt the pattern was more intermediate than a beginner pattern. There were a few places where I wasn’t clear on the instructions. Once or twice I actually did the wrong thing, ripped the seam and started all over again.
  3. I need to learn how to get the neck right. Since the neck is cut on a bias, I think it stretched while was stitching. It didn’t help a neck that was wider to begin with.
  4. The zipper took me a few iterations to get it right. I got an invisible zipper because that’s what most of the readymade dresses have. The first zipper I stitched the pull came off and it’s hard to get it back in for an invisible zipper. So then I bought another zipper. Eventually after 2-3 tries I got it done and now it looks beautiful (invisible).
  5. If you see behind the neck, you will find two seams on either side of the zipper. I had to put them in because otherwise the back wouldn’t sit flat on my back.

Still I like the dress Smile

December 29, 2017

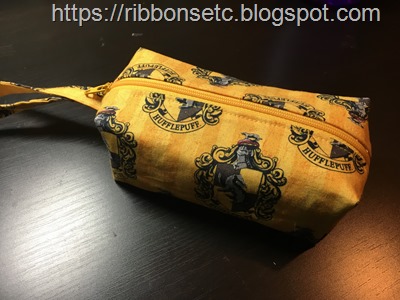
Harry Potter pencil case tutorial

I wanted to make a pencil case for a harry potter fan and came up with this using the tuts from here and here.

Box pouch made with harry potter fabric

What you will need:

  • Main fabric
  • Inner fabric for lining
  • Lightweight fusible interfacing
  • Zipper 11”
  • Thread and of course sewing machine!

I cut the following pieces

    • Cut 5.5” X 9.5” in size
      • 2 from the outer fabric
      • 2 from the inner fabric
      • 2 from the interfacing
    • Cut 2” X 10” from outer fabric

24832630998_9a916ae87d_o

Fold the long 2” X 10” piece on the short side. Iron. Fold each side again in half and iron. You will get a piece like above.

Fuse the fusible interfacing to the back side of the outer fabric. My outer and inner fabric are the same. You can see two of my pieces have interfacing and the other two don’t.

37987586674_2045cb55f7_o

Stitch the zipper to the outer fabric and then the inner fabric. You can find more detailed photos here.

38649532656_7f76ed6b44_o

Looks like I forgot to take a photo of the next step. With the outer fabric right sides together stitch the bottom. Open the zipper partially. With the inner fabric right sides together, stitch the bottom leaving an opening to turn the bag inside out. Flatten the bag with inner fabric and outer fabric stacked one over the other and the zipper in the center. Put your loop in place. Stitch on both the sides. Using the zipper opening, turn the bag inside out. Now to make the box corners. Pinch the corners and sew a 2” inch line like below on each corner.

26951291029_cc1a67cc5c_o

You will end up with this:

38694983942_dea844cf91_o

We still need to stitch the opening on the bottom of the inner lining. Do a slip stitch for that.

38694983982_2bce48efbb_o

26951291059_5a2d09911a_o

Turn the bag inside out!

38727453661_a778b680ea_o (2)

December 1, 2017

How to use sewing patterns 101

I’ve been using sewing patterns for a few years now to stitch clothes, bags etc. There are a lot of companies that make these patterns – McCall, Simplicity, Vogue, Burda are the big brands and then there are a lot of boutique designer patterns. Even after using the patterns for sometime now, I’m still learning them. That made me think how intimidating it must be to first start using them and hence the idea for this post. I thought I could share what I’ve learned so far. Here you go:

  1. Let’s start with the basics – pick the right size of pattern. Take your body measurements and look at the pattern to see which size you would need for your body measurements.
  2. Select the right fabric. This is one of the most important things. I have learnt the hard way. There were times when I chose to ignore what were the recommended fabrics for a pattern and just bought the fabric I wanted to make it with. Not a good thing to do. If you don’t know much about fabrics, you can search online fabric store for the type or better still go to your local fabric store (preferably not a big box store) and the attendants there are very helpful as well as knowledgeable. You can show them the pattern’s recommended fabric list and ask them what would work.
  3. Read the instructions completely before starting. And make sure you understand most of it. Some of them may get more clear when you start sewing it but you should get a good idea about what the general instructions are and how you would be sewing what you would be sewing.
  4. Cut the pattern to your measurements. It’s possible that the bust size of Size 16 is right for you but the waist is not. Every pattern has instructions on how to cut a pattern if your 3 measurements belong to two or three sizes. Read that and cut your pattern accordingly. This might mean you will not cut the pattern on the line for one size.
  5. Pay attention to instructions. When sewing, make sure your garment looks like what the picture shows at that step. It has happened to me a couple of times that I misunderstand the instruction and then my garment picture doesn’t match the pattern picture at that step. I think oh it’s a problem with the picture and carry on. No! Don’t do that! You might have to rip the seam and do it again and do that till you are satisfied with it.
  6. Be ready to rip the seams. Don’t be afraid or lazy to rip the seams as needed. It’s important to do it right for the pieces of the puzzle to fit together. For that if you need to rip the seams multiple times do it. The end result will be worth it.
  7. Try it out if it’s a garment. As often as possible try out the garment to see if it fits well. Once it’s done you can’t change much but you can right now. So try it out and see if it’s lose/tight/low/high/etc.
  8. Take notes. I’ve found things vary by pattern company. So take notes. Did the pattern company ask for more fabric that you needed? Did the size fit you well for this pattern company? Were the instructions clear? And so on. This is something I regret not doing.

November 17, 2017

Work in progress

If you are wondering what am I up to these days, well I’m working on some dresses for myself. Yes correct, in plural!

I have had these patterns for sometime and decided to put them to good use.

2848

I bought some linen blend fabric for this one – will be posting pictures soon. Cutting out the pattern pieces currently and pre-washing the fabric.

2591

For this, I got some nice soft cotton. Originally I’d selected a print from Cotton+Steel and it was so beautiful. However the fabric was short by 1/4 yd and I wasn’t sure if that would be ok or not. So I picked this other print which quite close to the one I liked. Again pictures will be coming soon!

January 11, 2017

Remote control couch caddy/holder

31980036256_f561d4435b_o

One of my friends asked me to make a remote control caddy for her. That motivated me to look around what people were making and what kind of a design would be good. After looking around on the interwebs, I came up with this design of my own. Sorry I don’t have a pictorial tutorial – but I promise that it’s so easy that you wouldn’t need one.

What you need:

  • 1 yard of fabric (if you want to add contrast then you can take two pieces of half yard of fabric)
  • Fusible fleece – 17” x 36”
  • Thread, scissors, rotary cutter and cutting mat (you can omit the last two if you want to cut the fabric using scissors); and of course a sewing machine

How to make remote control holder:

  1. Cut the fabric into two pieces – each measuring 36” X 17”.
  2. Iron the fusible fleece to the wrong side of one of the pieces (whichever you want to be the front).
  3. Now you have one fabric with fusible fleece and one plain fabric piece.
  4. Take the two fabrics, align them right sides together and stitch all around at a 1/4” (or 1/2” if you prefer) seam. Leave a small opening – around 4 inches wide – one one of the short sides.
  5. Now turn the stitched piece inside out using the opening. Iron the stitched piece so that the edges are crisp and fold in the fabric on the opening so that you can stitch it in the next step.
  6. Topstitch 1/8” the short side that does not have the opening.
  7. Take the short side (the one that does not have the opening) fold it 6” inwards. This will form the pocket. Pin it.
  8. Topstitch 1/8” all around the edges. Now you should have a big pocket.
  9. Make a mark 4” from the side of the pocket, on the pocket. On both the sides.
  10. Stitch vertically on the 4” mark from the bottom of the pocket to the top of the pocket. On both the sides. I drew a line first so that my stitching is straight. You now have 3 pockets!
  11. If you chose two different pieces of fabric, then the fabric of your pocket will be different from the front fabric. So pick fabrics that you like together.

April 15, 2016

Hello Kitty skirt

20160319_004510587_iOS

Another hello kitty item SmileI love making these simple skirts – fabric, thread, elastic and a sewing machine is all you need (and ~2 hours)! This is for a soon-to-be 5 year old and of course a hello kitty fan! All you need for skirts like these is the measure of the waist and length of the skirt. I loved the fabric when I saw it!

April 1, 2016

Ribbon trimmed tutu for 1-year old

ribbon trimmed tutu

My niece is going to turn one pretty soon! She looks like a doll and I thought a tutu would be just perfect for her. I love the color purple on her so picked this gorgeous purple tulle and matching ribbon. I followed the tutorial by Just add a bow. Making the tutu was a lot of fun but stitching tulle was not! I’ve not yet figured out what it was – I tried changing my needle, using the IDT (on my pfaff), cleaning the machine, putting a tape underneath the foot – but nothing seemed to work seamlessly. My thread kept breaking. Initially it was every few seconds but after I tried all the above things maybe every few minutes. This happened only when I was sewing the two tulle layers together to form the casing for the elastic. Sewing the ribbon on tulle didn’t give me these problems. If you’ve never stitched tulle before (like me) I would definitely recommend keeping the machine speed slow and maybe practicing on some scraps to see if you’re having any issues.

Other than it was quite enjoyable and done in a few hours. Also loved the finished product! I love how full it is!

ribbon trimmed tutu

I bought the tulle and ribbon from TulleShop. I’d to buy much larger quantities than I really needed but turned out that the price I would pay would be quite less than what I would pay in other stores. So I figured I might as well buy the larger quantities and save the rest for future use.

ribbon trimmed tutu

January 29, 2016

Quilted tote bag

20151226_203326224_iOS

I made this bag for my friend and was very happy with how it turned out. It was also super simple! It took me probably 2 hours or so to get it done.

I used the tutorial from Make it and love it. Instead of using a heavy fabric, I used the double sided quilted fabric (I got mine from Joann) and for the lining I used regular cotton fabric. Also I added a magnetic snap on button so that the bug could be shut close. I prefer to be able to close my bags – that way I know things won’t just fall off. You can leave that off.

Fabric required:

  1. For the outer fabric: 27”
  2. For the lining: 19”
  3. One package double fold binding (for the handles)
  4. One magnetic snap on button

As far as cutting and sewing is concerned I followed the tutorial exactly. With few exceptions:

  1. Since my fabric was a quilted fabric, I only cut two strips for the handle (unlike 4 in the tutorial. Then attached the binding to it.
  2. I needed to attach the snap on button. So once I’d sewn the lining pieces together, I kept them right sides together making sure all they were aligned. Then marked a point on the two lining pieces – 2-3 inches from the top and at the center of the width of the bag. Then added my button at this point. Continue with the tutorial after that and ta-da! Your bag is ready!

November 19, 2014

Make up or travel pouch/bag

DSC_0060

I made a bunch of these small bags using the tutorial at Moda Bake Shop. The tutorial is very clear and crisp and the bags turned out to be very neat and beautiful! I embellished them with hotfix rhinestones using a Bejeweller tool.

DSC_0061

October 6, 2014

Nexus 7 tablet case with stand

DSC_0058

I saw this tablet case and wanted to make it for my hubby’s nexus 7 tablet. I really like how it turned out and how simple it was to make. I’d to adjust the dimensions from the original tutorial but once I did that, it took me not more than 2 hours from start to finish!

DSC_0056

How cool it looks all closed up!

DSC_0057

Here’s a side view to show how thick it is.

Apart from the dimensions, I made a few other changes from the original instructions. On the inner fabric (that would be in contact with the tablet) I added fusible fleece to give the tablet some cushion. Also of the 4 chipboard pieces specified I only used 3 of them. I skipped the one on the fold (the fold on the other side of the elastic). You can see in the photo above where I skipped the chipboard. One of the reasons why I skipped it was I was falling short on the fabric – if I was going to put that chipboard in there wouldn’t be much fabric left for closing the other end. I guess it was because I added some fleece. So it might be a good idea to increase the length of the fabric if you’re going to put in some kind of cushioning.

The fabric dimensions can be calculated as follows:

  1. The width of the fabric = 1” + the longer side of the tablet
  2. For piece 1, the length is approximately 3 X the shorter side of the tablet
  3. For piece 2, the length is 2 X (shorter side of the tablet) + 0.5”
  4. For piece 3, the length is shorter side of the tablet+ 0.5”

For nexus 7 here are the dimensions of the fabric:

  • Piece #1: 9” X 14”
  • Piece #2: 9” X 9.5”
  • Piece #3: 9” X 5”

The chipboard dimensions can be calculated as follows:

  1. Width of the fabric  = longer side of the tablet + 0.5”
  2. Piece 1, length = shorter side of the tablet
  3. Piece 2, 0.5”
  4. Piece 3, length = shorter side of the tablet + 0.25”
  5. Piece 5, length = (shorter side of the tablet ) / 2

For nexus 7 here are the chipboard dimensions:

  • 1 – 8.5” X 4.5”
  • 2 – 8.5” X 0.5”
  • 1 – 8.5” X 4.75”
  • 1 – 8.5” X 2.25”

April 9, 2014

My second quilt

DSC_0445

I started this quilt as part of a class that I took at Pacific Fabrics, Bellevue. It was called Pop Art Quilt or something and is made from a jelly roll. I used the Snap Pop fabric from Moda (I think that’s what it’s called). The actual dimensions seemed too small to me so I added 3 borders. The middle border is made from left over scraps. For the innermost and the outermost border I’d to buy some more fabric. Plus some fabric for the backing – I got the 108” wide one so that I didn’t have piece the fabric together. I quilted it too and I must say it was so much easier with my new Pfaff Ambition 1.5. I’m loving that machine! I did not to stitch in the ditch instead stitched along the ditch, at an allowance of 0.25”.

I learnt how to make the sandwich using this video and I would highly recommend it! Its total genius!

I did buy a quarter inch foot since quilting involves so much of quarter inch sewing and it did make my life a whole lot easier! This is the first time I made my own binding and this is the video I referred to. It made me so happy to make my own binding and I must say it came out quite neat!

Can you see the staircase pattern of the colors? The quilt is approx 54” X 60”.

January 30, 2014

No sew fleece throw

DSC_0120

I made this fleece throw for my nephew; it was lot of fun doing it. I used the tutorial from here.

Doesn’t it look adorable? My nephew is very fond of animals so it seemed perfect for him!

I used 1.5 yards fleece each for the front and the back. The fleece is anti-pill, as the name suggests it won’t pill and it was so soft and cozy!

  1. Put your front and back fabrics wrong side together.
  2. Cut 6” squares off the corners.
  3. Using a quilting ruler and a rotary cutter, I cut fringe 6” long and 1” wide.
  4. Then starts the knotting and voila you’re done!

I love how the knots came out. It took me a few knots to get a hang of it and then on they were all uniform.

November 5, 2013

Craft fair goodies–Travel tissue pouches

DSC_0091

I used the tutorial from here and added some yo-yo flowers, trim and/or lace. I really enjoyed making them!

April 5, 2013

My first quilt


DSC00720
I started this quilt back in December and it took me four months to get it done! It’s a very simple quilt with just chain stitching; but it makes me very happy! Quite a long time back I used to eye various quilts that I would see around me and wish that I would make a quilt one day. Then a few days later I would be totally dissuaded considering the gigantic size of the project – literally and figuratively! I don’t know how and when I decided that I was going to make one – I guess the day I bought the fabric Smile. I found a set of fat quarters on sale and decided that they would be perfect for a quilt. I believe it’s the Verona collection from Moda fabrics. Then began the cutting, the piecing and the quilting! Oh how I frustrated I’d been during the quilting, cursing my sewing machine all along; taking breaks along the journey lest I throw my machine out of the windows or go bald pulling all my hair! Then came the sweet day – the day when I added the binding and had in front of me a beautiful piece of quilt! When you’ve been through so much pain, you can totally appreciate the end result.
Initially I started with quilting in the ditch, then thought maybe I could do some diagonals but it turned out to be too much work so I returned back to quilting in the ditch!
Anyways…it’s almost a full sized quilt. There are a lot of things I learned:
  1. ALWAYS make sure that your pieces are straight and to the measure.
  2. A 1/4” seam means 1/4” – no less and no more.
  3. After piecing, if you don’t have a rectangle/square, trim it to one.
  4. After quilting, if you don’t have a rectangle/square, AGAIN trim it to one.

August 27, 2012

Apron

I made this apron for my friend. This is the second time I’m using this pattern. I made the same apron for myself sometime back.

DSC00109

The pattern is McCalls 5643; and yes I used the remnant fabric as frills on this tote bag. I simply love it when I can put remnant fabric to good use!

August 22, 2012

Ruffle bag/tote

I wanted to make something for my friend’s 5-year old when I came across this pretty bag. It just so happened that I’d the required and so I got working!

DSC00108

It was pretty straightforward to make this except a few things:

  1. The way to attach handles is different from what I see usually. Not only did I have trouble sewing so many layers but also the way the handle stands up is not how I would like it to. If I were to make this bag again then I would simply sandwich the bag between the outer fabric and the inner lining and stitch it through.
  2. Per the tutorial, when stitching the bottom, you stitch the outer fabric and the lining together. Again this is different than what I’ve usually seen. It could be for ease and simplicity but the next time I would stitch them separately. As a beginner it was hard for me to align the inner and outer layer together.

Above are just minor things which would make a difference for an adult but I think wouldn’t be so noticeable by a kid. I added the ruffles only on the front side since that was all the fabric I had. Each ruffle fabric was around 44” in length and as you can see it ruffled up pretty well. The outer fabric is home decorator fabric, the ruffles are quilting/regular cotton and the lining is also I believe regular cotton.

I hope the kiddo likes it!

February 13, 2012

I’m back…with some kitchen towels!

I’ve been on a long vacation. If you don’t want to read the details jump over to the next paragraph! First it was good long complete vacation which consisted of going to India and then a a short mental vacation. I wanted to give myself time and not just start crafting/blogging because I had to; because I didn’t *have* to. I felt in some corner of my heart at that times I did either/both because I felt I must – even though life was busy I would think I must take out time do these. However after my vacation I truly realized that do both because I like to do them. I should enjoy and savor every moment; and not jump from one task to another. So I gave myself a good break and decided I’ll make things as and when I feel like and same for blogging. With blogging many a times it’s not that I don’t feel like blogging, it’s just the thought of taking a picture, importing it…the whole nine yards puts me off! I wish it was a little easier – like I could take a picture from my phone and simply share it! Maybe somebody will make an app like that for me! Anyhoo let me show you what I made before you get tired of my monotone and close the browser window!

DSC09529

These used to be hand towels in their previous life! I was cleaning my linen closet when I realized that they were no longer being used and lately my mom, with her creations, had really inspired me to up-cycle something. When I saw these towels I couldn’t help but grin! There I had my guinea pigs! This transformation is inspired from a kitchen towel that I bought from one of my craft fairs last year. I like that they used snap fasteners so I didn’t have to worry about buttonholes – seriously they really scare me! I read this tutorial on make-it and love-it on how to attach snap fasteners. I’m not great at doing sewing tutorials otherwise I would’ve done one on how to make these. However if you have any questions or would like to know how to them, feel free to shoot me an e-mail!

I’m absolutely loving them! Ah what satisfaction they give me that they cost $0 (ok I did buy the snap fasteners…)!